







3D Printed Surgical Guides: Step-by-Step Workflow
How to produce implant surgical guides in-house on the iLux Pro Dental: scan, design, print, wash and cure, and finish, with the equipment and materials each step needs.
How is a surgical guide 3D printed?
A surgical guide is planned from a CBCT scan merged with an intraoral scan, designed with drill openings that match the planned implant positions, and exported as an STL file. It is then printed in a rigid surgical guide resin such as LuxCreo DSG-07, washed, cured, and finished. Before clinical use, the applicable manufacturer’s instructions for use must be followed for all required preparation and post-processing steps.
Scan, design, print, wash and cure, finish
The clinician owns the implant plan. Once the guide design is approved, printing and post-processing can be handled by trained staff in the practice.
-
Step 1
Scan
Take a CBCT scan for bone and nerve anatomy and an intraoral scan for teeth and soft tissue. The two datasets are merged in implant planning software.
-
Step 2
Plan and design
Plan the implant positions, then design the guide with drill openings or sleeve seats that match the plan. The clinician approves the design and exports it as an STL file.
-
Step 3
Prepare the print
Import the STL into LuxFlow, which adds supports and places the guide on the build platform. Keep supports away from the fitting surface and the drill openings.
-
Step 4
Print
Print in DSG-07 surgical guide resin on the iLux Pro Dental. LuxCreo lists surgical guide print speed at about 30 mm per hour.
-
Step 5
Wash and cure
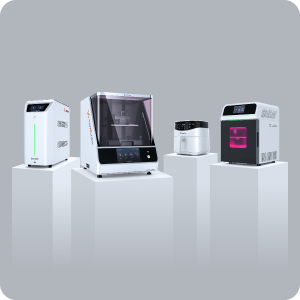
Clean off uncured resin in the iLuxWash Dental, then post-cure in the iLuxCure Pro using the DSG-07 settings from LuxCreo’s application guide.
-
Step 6
Finish and prepare for surgery
Remove supports and smooth any contact points. Insert metal sleeves if your guided surgery system uses them, and check the fit on a printed model. Before clinical use, confirm the applicable post-processing and preparation requirements with the material manufacturer.
What you need for in-house surgical guides
| Step | Equipment or material | Notes |
|---|---|---|
| Scan | CBCT unit and intraoral scanner | The practice’s existing imaging equipment |
| Plan and design | Implant planning and guide design software | Exports the guide as an STL file |
| Print preparation | LuxFlow | Supports and nesting on the build platform |
| iLux Pro Dental | DLP printer, 50-micron resolution | |
| Resin | LuxCreo DSG-07 surgical guide resin | FDA Class I. Partner option: Dreve FotoDent guide |
| Wash | iLuxWash Dental | Removes uncured resin |
| Cure | iLuxCure Pro | Post-cure with DSG-07 settings |
| Fit check | Printed model (LuxCreo dental model resin) | Optional check before surgery |
| Finish | Metal sleeves (if used), finishing tools | Per your guided surgery system |
DSG-07 surgical guide resin at a glance
71 MPa flexural strength
A stiff guide holds drill angles. DSG-07 has a flexural modulus of 1,978 MPa and a Shore D hardness of 84.
81.5°C heat deflection
Heat deflection temperature measured at 0.455 MPa (ASTM D648).
ISO 10993 tested
Passed in vitro cytotoxicity (ISO 10993-5) and oral mucosa irritation and skin sensitization (ISO 10993-10). FDA Class I.
Values from the DSG-07 technical data sheet (v1.1), tested on LuxCreo’s printing system. Properties vary with print orientation, settings, and post-processing.
Getting an accurate guide
Protect the fitting surface
Place supports on outer surfaces so the side that seats on teeth or tissue stays smooth and accurate.
Cure fully
Under-cured resin is softer. Use the validated cure settings so the guide reaches its stated stiffness.
Verify before surgery
Check seating and sleeve fit on a printed model. Confirm any additional preparation requirements with the material manufacturer before clinical use.
Surgical guide printing questions
What resin is used to 3D print surgical guides?
Surgical guides are printed in a rigid, biocompatible guide resin. On the iLux Pro Dental, LuxCreo’s DSG-07 is an FDA Class I surgical guide resin that passed ISO 10993-5 and ISO 10993-10 testing. Dreve FotoDent guide is also validated as a partner material.
What scans do I need for a surgical guide?
You need a CBCT scan to show bone and nerve anatomy and an intraoral scan to show the teeth and soft tissue. Implant planning software merges the two so implant positions and drill openings can be planned together.
How long does it take to print a surgical guide?
LuxCreo lists surgical guide print speed at about 30 mm per hour on the iLux Pro Dental, so print time depends on the guide’s height and orientation. Washing, curing, and finishing add time based on the resin’s instructions.
Can a 3D printed surgical guide be sterilized?
LuxCreo reports having tested high-temperature autoclave sterilization of surgical guides, but does not currently provide formal sterilization guidance for these guides. This testing should not be treated as an approved sterilization protocol. Before clinical use, obtain and follow the applicable manufacturer’s instructions for use and confirm material-specific requirements with LuxCreo.
Who can run surgical guide printing in a practice?
The clinician plans the implants and approves the guide design. Trained staff can then prepare the print in LuxFlow, run the iLux Pro Dental, and handle washing, curing, and finishing.
Print surgical guides in-house
A LuxCreo specialist can walk you through the surgical guide workflow on the iLux Pro Dental and how it fits with your other in-house applications.
This guide describes a general workflow and reflects information published by LuxCreo at the time of writing. It is not clinical guidance. Implant planning and guide approval are the clinician’s responsibility. Follow the instructions for use for every material and device, and confirm current details with LuxCreo.