


How to Use a Dental 3D Printer: Complete Digital Workflow from Scan to Same-Day Delivery
Introduction
The modern dental practice operates at the intersection of digital innovation and clinical excellence. The transition from week-long outsourced aligner manufacturing to same-day chairside 3D printing represents a fundamental transformation in how practitioners deliver orthodontic care. Yet understanding how to use a dental 3D printer extends far beyond simply pressing a button—it requires mastery of a complex, integrated digital workflow where each stage builds upon the previous one.
This comprehensive guide walks you through every stage of the dental 3D printing workflow, from the moment a patient sits in your chair for an intraoral scan through the moment they leave wearing a custom-fabricated aligner. We’ll explore the critical software integrations, time requirements for each stage, quality checkpoints that ensure clinical success, and the economic advantages that make same-day delivery possible.
Whether you’re a seasoned orthodontist exploring in-office production capabilities, a dental lab manager evaluating workflow modernization, or a practice administrator planning a technology implementation, this guide provides the practical knowledge necessary to master the complete digital workflow and maximize the potential of your 3D printing investment.
Understanding the Four-Stage Dental 3D Printing Workflow
The complete digital workflow for dental 3D printing comprises four distinct yet interconnected stages, each with specific objectives, time requirements, and quality checkpoints:
- Data Acquisition & Treatment Planning (15–30 minutes)
- Design & Print Preparation (10–20 minutes)
- 3D Printing & Automated Post-Processing (120–180 minutes)
- Finishing & Patient Delivery (15–30 minutes)
Total Time to Patient Delivery: 2.5–3.5 hours
This dramatic compression of what traditionally required 2–4 weeks represents the core value proposition of in-office 3D printing. Understanding how to achieve this timeline requires detailed knowledge of each workflow stage and the software ecosystem that integrates them.
Stage 1: Patient Data Acquisition & Treatment Planning
The Foundation: Intraoral Scanning
The digital workflow begins with precise capture of the patient’s oral anatomy. Modern intraoral scanners (IOS) create detailed 3D digital impressions with accuracy specifications of 20–50 microns—precise enough to capture the finest details of tooth anatomy essential for aligner fit.
Critical Scanning Considerations:
- Scanner Selection: Invest in high-resolution intraoral scanners with minimum 50-micron resolution. Popular options integrate with major treatment planning platforms including 3Shape, Titan, ULab, and Carestream.
- Scanning Protocol: Capture the entire dental arch including buccal and lingual surfaces. A systematic approach—starting from posterior on one side, moving anteriorly, then completing the contralateral side—ensures comprehensive coverage and reduces scanning time to 3–5 minutes.
- Data Validation: Immediately review the scan in your treatment planning software. Verify that tooth margins are clearly delineated, there are no obvious gaps or artifacts, and the occlusal plane is well-captured.
Treatment Planning Integration
The intraoral scan data imports directly into treatment planning software—the critical intermediary between raw patient data and printable files.
Treatment Planning Software Ecosystem:
Your choice of treatment planning platform determines downstream workflow efficiency. Leading platforms compatible with direct-print workflows include:
- 3Shape Ortho X: Industry-leading platform offering intuitive tooth movement simulation, attachment planning, and automated sequencing. Integrates seamlessly with LuxDesign for direct-print aligner generation.
- Titan Platform: Comprehensive treatment planning with built-in smile design tools. Supports customized treatment sequences and direct export to printing software.
- ULab Aligner System: Cloud-based solution enabling collaborative treatment planning with built-in aligner thickness optimization and force analysis.
Treatment Plan Development:
Within treatment planning software, you define the entire therapeutic arc—from the patient’s current dentition through to the final desired position. This involves several critical decisions:
- Staging Parameters: Decide the number of aligner stages. Traditional thermoformed workflows often require 20–40 stages. Direct-printed workflows with ActiveMemory™ technology can achieve results in 8–15 stages, as the material sustains force longer and recovers shape through thermal activation.
- Attachment Placement: Identify tooth positions requiring mechanical anchorage points. Direct-print technology allows precise, digital attachment placement in contrast to thermoformed aligners where attachments are often added manually post-production.
- Trim-Line Design: Determine optimal aligner extent—typically 0.5 mm subgingival at interproximal areas and 1–2 mm buccal coverage for retention. Digital trim-line design ensures consistency across all stages.
- Overjet & Overbite Targets: Define final sagittal and vertical relationships. Treatment planning software simulates tooth movements and predicts final positioning.
Time Requirement for Stage 1: 15–30 minutes
The time investment here depends on case complexity. Mild spacing or crowding cases may require only 15 minutes of clinician review and approval. Complex cases with multiple movement vectors require 25–30 minutes. The key efficiency gain: you’re no longer dependent on external lab technicians to interpret your clinical intentions—you define them directly in digital format.
Stage 2: Design Automation & Print Preparation
The Critical Integration Point: From Treatment Plan to Printable Files
The transition from treatment plan to production-ready prints is where many practices experience workflow friction. This is also where advanced software automation creates the greatest time savings.
LuxDesign: Automated Aligner Shell Generation
Once you’ve approved a treatment plan in your planning software, you export the sequential digital models (in STL format) directly to LuxDesign—specialized software optimized for direct-print aligner fabrication.
Key LuxDesign Functions:
- Automatic Model Repair: Imported STL files may contain minor artifacts—inverted normals, non-manifold edges, or mesh irregularities. LuxDesign automatically identifies and repairs these issues, ensuring watertight geometry without manual intervention.
- One-Click Aligner Shell Generation: With a single command, LuxDesign converts approved treatment plan data into optimized aligner shell geometry. The AI-powered system:
- Generates precise aligner thickness profiles
- Creates optimal occlusal relief for functional movements
- Calculates ideal trim lines for retention without excessive coverage
- Positions attachment points with precise geometry
- Multi-Thickness Design: This represents a quantum leap over traditional uniform-thickness thermoformed aligners. LuxDesign enables programmable thickness variation:
- High-stiffness zones (0.8–1.0 mm) at anchor areas requiring strong force application
- Gradient-thinned surfaces where gentle forces suffice
- Thin occlusal surfaces (0.5 mm) for improved comfort during function
- This thickness modulation directly translates to optimized force delivery—delivering stronger forces where needed and gentle forces elsewhere, mirroring the way experienced clinicians would manually adjust appliance stiffness.
- Customizable Attachment Design: Precisely define attachment height, width, and angle rather than relying on technician judgment. Reproducibility across all stages ensures consistent mechanical advantage.
- Block-Out Generation: Automatically creates undercut blockout geometry to prevent resin entrapment in interproximal spaces—critical for proper aligner fit.
Time Requirement for LuxDesign Processing: 2–5 minutes
For most cases, the system requires minimal user input. Experienced operators can generate print-ready aligner shells for all stages in under 5 minutes. The automation eliminates what was historically 20–30 minutes of manual model preparation, support addition, and file optimization.
File Format Standards and Compatibility
Understanding file formats ensures seamless data transfer through your workflow:
- STL (Stereolithography) Format: The universal file format for 3D printing. All treatment planning software exports STL; all 3D printers accept STL. STL files contain only surface geometry (no color, material properties, or internal structure data).
- Proprietary Formats: Some advanced software platforms use proprietary formats optimized for specific applications—such as LuxDesign’s native format for storing thickness variation information that would be lost in basic STL export.
Best Practice: Maintain both STL and proprietary format backups. STL ensures universal compatibility; proprietary formats preserve optimization information for future iterations.
LuxFlow: Print Preparation and Support Generation
LuxFlow is specialized print-preparation software that takes aligner shell geometry and optimizes it for 3D printer execution.
LuxFlow’s Automated Functions:
- Model Orientation Optimization: Positions each aligner on the build platform at 10–15° angle. This angle balances multiple competing objectives:
- Minimizes support material contact with critical fitting surfaces
- Orients layers for optimal optical penetration
- Reduces post-processing time by positioning features that require smoothing away from the build platform
- Intelligent Support Generation: Creates optimal support structures that:
- Provide adequate anchoring without distorting the aligner
- Minimize contact points with fitting surfaces to reduce post-processing work
- Use minimum material consistent with structural requirements
- Automatically adjust support density based on local geometry
- Nesting and Batching: Intelligently arranges multiple aligner stages on the build platform, calculating optimal spacing that maximizes printer utilization while maintaining print quality. Modern systems can fit 8–12 aligner stages per build on desktop printers like the iLux Pro Dental.
- Resin-Specific Slicing: Generates print instructions (slice files) customized for specific resin properties. Different resins have different photopolymerization characteristics; LuxFlow adjusts layer thickness (typically 25–50 microns) and exposure timing based on resin specifications.
Time Requirement for LuxFlow Processing: 5–15 minutes
Including model loading, optimization, and file export, the complete LuxFlow process typically requires 5–15 minutes. Most of this occurs automatically; operator involvement is mainly confirming suggested orientations and pressing “Export to Printer.”
Quality Checkpoint: Before printing begins, review the LuxFlow preview showing support positioning and aligner orientation. Verify that no supports contact critical fitting surfaces (interproximal areas, occlusal tables). Experienced operators can often identify in this preview whether print quality will be optimal.
Time Requirement for Stage 2: 10–20 minutes
End-to-end, the transition from approved treatment plan to ready-to-print files takes 10–20 minutes—primarily composed of software processing time rather than active operator work. This represents another major efficiency advantage over traditional workflows.
Stage 3: Direct 3D Printing & Automated Post-Processing
The Printing Stage: From Digital Design to Physical Aligners
Printer Selection and Setup
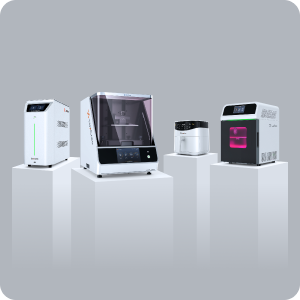
The iLux Pro Dental 3D printer represents the current standard for chairside aligner production. Understanding its operation is essential for consistent, high-quality output.
Key Equipment Specifications:
- Build Volume: 192 × 108 × 200 mm (approximately 7.6 × 4.3 × 7.9 inches)—sufficient for upper and lower arches on a single build platform
- XY Resolution: 50-micron pixel pitch—equivalent to individual pixel size. This translates to approximately 76 DPI (dots per inch) in familiar terms, sufficient for capturing fine tooth details
- Wavelength: 385 nm (near-ultraviolet light)
- Layer Thickness: 25–50 microns (printable layer height) depending on resin type and desired surface quality
- Build Speed: Material-dependent; typically 50–60 mm/hour, equating to approximately 60–90 minutes for a standard-height aligner build
Printer Calibration and Pre-Print Verification:
Before each print session, perform critical calibration steps:
- Build Platform Leveling: Use provided leveling jig to verify build platform is perfectly parallel to optical engine. Improper leveling causes thickness variation across the build.
- Resin Tank Inspection: Visually confirm resin tank is clean (no debris or solidified resin particles). Any contamination acts as an optical scatter point, creating weak spots in prints.
- Resin Temperature Verification: Confirm resin temperature is 23–26°C. Resin viscosity changes dramatically with temperature; cold resin prints more slowly, hot resin can over-expose.
- Software File Verification: Confirm the correct STL/slice file is loaded, orientation is appropriate, and material selection matches the resin actually in the printer.
Material Selection: DCA Resin and ActiveMemory™ Polymer
The choice of printing resin fundamentally determines aligner properties.
LuxCreo DCA Resin (Direct Clear Aligner Material):
- Composition: Photocurable, proprietary polymer resin system incorporating ActiveMemory™ technology
- Optical Properties: >90% light transmission post-cure, delivering the crystal-clear transparency required for aesthetic aligners
- Mechanical Properties:
- Flexural Strength: ~38 MPa
- Shore D Hardness: ~71 D
- Tensile Modulus: ~1000–1200 MPa
- These properties deliver sufficient stiffness for force delivery while maintaining some elasticity to avoid brittleness.
- Biocompatibility: FDA Class II 510(k) cleared; passes comprehensive ISO 10993 testing including:
- Cytotoxicity testing
- Oral mucosa irritation assessment
- Skin sensitization evaluation
- Genetic toxicity screening
- ActiveMemory™ Technology: The defining feature of DCA resin is shape memory capability. After deformation during wear, briefly soaking the aligner in 60°C (140°F) hot water causes the aligner to:
- Recover original geometry within 0.1 mm precision
- Regenerate mechanical properties (elasticity and stiffness)
- Restore force delivery to optimal levels
- This means each aligner effectively feels brand-new after daily thermal activation—a dramatic departure from thermoformed aligners that gradually lose force over the wear cycle.
Executing the Print
- Load Resin: Fill the resin tank to specified level. The printer includes an automatic resin level sensor; ensure it’s reading correctly before starting.
- Initiate Print: Use printer interface or connected software to start the print job. The printer will:
- Warm the resin to optimal temperature
- Initialize the optical engine and temperature sensors
- Begin layer-by-layer printing, typically processing 2–4 layers per minute
- Monitor Print Progress: Most modern printers include real-time monitoring. Check periodically (every 30 minutes) for:
- Any error messages or warnings
- Visible print progress in the resin tank (you can observe layers building)
- No unusual sounds or vibrations (which might indicate mechanical issues)
Typical Print Duration: 90–150 minutes
Print time depends on:
- Number of aligner stages (each stage adds approximately 15–20 minutes)
- Resin type (different resins have different polymerization speeds)
- Layer thickness selection (thinner layers take proportionally longer)
A typical 8-stage batch requires approximately 2 hours of unattended printing. This is a critical efficiency factor: once printing begins, no operator intervention is required. Staff can focus on other clinical duties while the printer runs automatically.
Post-Processing Stage 1: Automated Washing (iLuxWash Dental)
The moment printing completes, aligners still contain uncured resin in all the tiny gaps created by the support structure, in micro-cavities within the material, and on the surface. Thorough washing is essential before curing—uncured resin would remain sticky and potentially contaminate the mouth.
Washing Protocol:
- Manual Support Removal (5–10 minutes): Carefully break away support structures using fine flush cutters. The goal is removing bulk supports while leaving small contact points.
- Primary Wash Cycle (8 minutes): Place aligners in iLuxWash Dental with isopropyl alcohol (IPA). The system:
- Applies ultrasonic vibration (frequency ~40 kHz) to dislodge uncured resin particles
- Uses a magnetic-driven impeller to actively stir the solvent
- Applies gentle heating (around 50°C) to optimize solvent action
- The ultrasonic energy creates microscopic cavitation bubbles that collapse and violently agitate the washing medium, effectively scrubbing away trapped uncured resin.
- Secondary Wash Cycle (8 minutes): Transfer aligners to fresh IPA for a second 8-minute wash cycle. This removes residual uncured resin particles suspended in solution from the primary cycle.
- Drying (5 minutes): Remove aligners and air dry. Some practitioners use compressed air to expedite drying; ensure any compressed air is medical-grade (filtered to remove contaminants).
Time Requirement: 20–25 minutes total
The two-cycle washing approach is essential. A single wash cycle leaves residual uncured resin; a second cycle ensures complete removal.
Quality Checkpoint: Examine aligners under bright light. The material should be completely clear with no visible resin residue (which would appear as cloudy patches or sticky spots). If cloudiness persists, additional wash cycles may be needed.
Post-Processing Stage 2: UV Curing (iLuxCure Pro)
While washing removes uncured resin from the surface, the material itself still contains partially polymerized resin chains. UV curing completes the photopolymerization process, optimizing mechanical properties and ensuring full biocompatibility.
Curing Specifications:
- UV Wavelength: 405–385 nm (matching the printing wavelength to complete polymerization initiated during printing)
- Intensity: High-intensity lamps delivering >2000 mW/cm²
- Coverage: 360° curing—the iLuxCure Pro provides both upward and downward illumination simultaneously
- Duration: 10 minutes per side (20 minutes total) for typical aligner thickness
The iLuxCure Pro’s unique design includes:
- Rotating turntable to ensure all surfaces receive uniform exposure
- Heating element (typically 60°C) to optimize curing kinetics
- Uniformity specification of 95%, ensuring consistent intensity across the curing chamber
Curing Protocol:
- Place aligners in the curing chamber with spacing to allow light penetration between pieces
- Select the appropriate curing program (varies by resin type)
- Initiate the automated curing cycle—typically 10 minutes for the first side
- Flip aligners and cure the opposite side for another 10 minutes
- Allow aligners to cool to room temperature (approximately 5 minutes)
Time Requirement: 25–30 minutes total
Quality Checkpoint: Post-cure, the aligners should be completely clear and rigid. Gently flex an aligner—it should spring back to shape rather than remaining deformed. If the material still feels rubbery or remains cloudy, additional curing may be needed.
Heat Curing for Shape Memory Activation (DCA Material)
For DCA resin specifically, an optional but recommended additional step optimizes the ActiveMemory™ property.
Heat Cure Protocol:
- Heat water to 60°C (140°F)
- Briefly soak cured aligners (2–3 minutes) to activate shape memory mechanisms
- Allow to cool to room temperature
- The aligner is now fully conditioned and ready for delivery
This heat treatment “locks in” the shape memory programming, ensuring optimal force recovery when patients later perform their daily hot-water thermal activation ritual.
Time Requirement: 5–10 minutes
Total Stage 3 Time: 2–2.5 hours
Including printing, washing, curing, and heat activation, the complete printing and post-processing stage requires approximately 2–2.5 hours. Critically, after the print initiates, the operator requirements are minimal—mostly automated equipment handling with periodic monitoring.
Stage 4: Final Finishing & Patient Delivery
Support Removal and Fine-Finishing
By this stage, aligners have been mostly completed and are ready for final finishing touches that ensure optimal patient experience.
Fine-Surface Finishing:
- Microscopic Support Point Removal: Use fine-grit sandpaper (220–400 grit) or fine polishing stones to smooth any remaining support contact points. Pay particular attention to interproximal areas where support contact could create sharp edges that irritate soft tissues.
- Edge Smoothing: Gently round any sharp edges on the trim line using fine sandpaper. Patients will rest their lips against trim lines for hours daily; rough edges cause discomfort.
- Surface Polish (Optional): Many practices perform a final light polish to enhance clarity. LuxCreo’s Digital Polishing™ technology during printing delivers 80% higher clarity than competing systems, often eliminating the need for manual polishing entirely. If additional polish is needed, specialized dental polish compounds can be applied with soft buffing pads.
Time Requirement: 5–10 minutes per case
Quality Control and Dimensional Verification
Before delivery to the patient, perform final quality verification:
- Visual Inspection: Examine aligners for:
- Complete transparency (no cloudy areas indicating inadequate curing)
- No visible voids or defects
- Smooth trim lines and edges
- Accurate color (should match the aligner material specification)
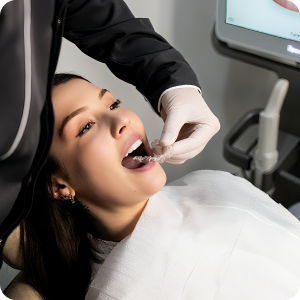
- Fit Verification: Perform a trial seating of the aligner on the patient’s teeth. The aligner should:
- Seat fully without gaps at the margins
- Maintain firm contact with axial tooth surfaces
- Not require excessive force to insert or remove
- Dimensional Accuracy (Optional but Recommended): For critical cases, use digital calipers or a secondary scan to verify dimensional accuracy against the treatment plan. Direct-print aligners typically achieve ±0.1 mm accuracy.
Time Requirement: 5–10 minutes
Patient Education and Delivery
Once aligners pass quality control, patient education becomes critical for treatment success:
Patient Communication Points:
- Wear Schedule: Clear aligners should be worn 20–22 hours daily (removing only for meals and oral hygiene). More frequent wear accelerates tooth movement and maintains continuous force application.
- Insertion and Removal Technique: Demonstrate proper technique using the model. Improper manipulation can distort aligners or cause breakage.
- Daily Thermal Activation (DCA/ActiveMemory™ Material): Patients should briefly soak aligners (2–3 minutes) in warm water (60°C/140°F) daily. This:
- Reactivates the aligner’s shape memory, restoring geometry and force
- Cleans the aligner
- Ensures the aligner feels refreshed and provides consistent force
- Cleaning Protocol: Aligners should be cleaned with warm water and a soft brush. Advise against:
- Dishwashers (excessively hot water can warp thermoformed but not DCA aligners)
- Harsh abrasive cleaners
- Overnight soaking (not necessary with proper daily care)
- Timeline and Follow-Up: Define when to advance to the next aligner stage and schedule follow-up appointments. With direct-print technology, you often schedule patients to return in 1–2 weeks rather than 2–3 weeks, allowing closer monitoring of tooth movement.
Time Requirement for Patient Education and Delivery: 10–15 minutes
Complete Workflow Timeline Summary
| Stage | Activity | Time Required |
| Stage 1 | Intraoral scanning | 3–5 min |
| Treatment planning review/approval | 10–25 min | |
| Subtotal | 15–30 min | |
| Stage 2 | LuxDesign shell generation | 2–5 min |
| LuxFlow print preparation | 5–15 min | |
| Subtotal | 10–20 min | |
| Stage 3 | 3D printing | 90–150 min |
| iLuxWash automated washing | 20–25 min | |
| iLuxCure automated curing | 25–30 min | |
| Optional: Heat cure for activation | 5–10 min | |
| Subtotal | 140–215 min (2.3–3.6 hours) | |
| Stage 4 | Fine finishing | 5–10 min |
| Quality verification | 5–10 min | |
| Patient education/delivery | 10–15 min | |
| Subtotal | 20–35 min | |
| TOTAL TIME TO PATIENT DELIVERY | 2.5–3.5 hours |
Compare this to traditional thermoformed workflows:
- Scanning: 5 minutes
- Lab processing and shipping: 2–4 weeks
- Return shipping: 2–3 days
- Patient appointment for delivery: 30 minutes
- Total: 14–28 days
The compression from weeks to hours represents the core value driver for same-day delivery technology.
Software Integration Architecture: Connecting the Workflow
Understanding how software platforms communicate across the workflow is essential for troubleshooting and optimizing efficiency.
The Integration Chain
Intraoral Scan
↓
Treatment Planning Software (3Shape, Titan, ULab)
↓
Export to STL format
↓
LuxDesign (Aligner Shell Design)
↓
LuxFlow (Print Preparation & Slicing)
↓
Printer Control Software
↓
3D Printer (iLux Pro Dental)
↓
Post-Processing Equipment (iLuxWash, iLuxCure)
↓
Patient Delivery
Critical Integration Points
- Treatment Plan to LuxDesign: Compatibility depends on treatment planning software’s export capabilities. Ensure your chosen planning platform directly exports to LuxDesign’s native format (not just generic STL). This preserves tooth movement sequence information and attachment locations.
- LuxDesign to LuxFlow: This handoff is typically seamless—LuxDesign exports optimized aligner shells directly to LuxFlow. Verify that thickness and attachment information transfers correctly.
- LuxFlow to Printer: LuxFlow generates slice files specifically formatted for your printer model. Confirm file format compatibility before first use.
Version Control and File Management
With multiple software platforms and numerous case files in circulation:
- Naming Convention: Develop a consistent file naming system. Example: “Smith_Jane_DOB020495_Case01_S01_v2” includes patient name, DOB, case number, stage, and version.
- Archive Protocol: Maintain secure archives of all treatment plans and STL files. This enables:
- Reordering replacement aligners if a patient loses one
- Modifications mid-treatment without rescanning
- Reference for future similar cases
- Cloud Integration: Many practices use cloud-based solutions (LuxCloud Dental) for storing designs, enabling access from multiple workstations and automatic backup.
File Format Standards and Proprietary Considerations
STL Format: The Universal Standard
STL (stereolithography) format is the industry standard for 3D printing data:
STL File Characteristics:
- Contains only surface geometry (triangle mesh) defining aligner outer profile and internal surfaces
- Does not encode material properties, colors, or thickness information
- Universally compatible—all 3D printers accept STL
- Typical file sizes: 2–5 MB per aligner stage
STL Export Verification:
After exporting STL from treatment planning software, verify:
- File size is reasonable (2–5 MB for dental applications)
- File opens cleanly in slicing software without errors
- Geometry visually matches the treatment plan
Proprietary Format Advantages
LuxCreo’s proprietary formats preserve optimization information:
- LuxDesign Native Format: Includes thickness variation profiles, attachment specifications, and trim-line definitions
- LuxFlow Native Format: Contains slice-file information and support generation data
Best Practice: Maintain both STL and proprietary format exports. STL provides universal compatibility; proprietary formats preserve optimization that might be needed for future modifications or if you switch to upgraded software versions.
Quality Checkpoints Throughout the Workflow
Implementing quality checkpoints at each stage prevents costly errors and ensures consistent clinical success.
Stage 1 Checkpoint: Scan Quality Verification
Inspection Criteria:
- Entire dental arch is captured with no significant gaps
- Tooth margin definition is sharp and clear
- Occlusal surfaces are well-represented
- No obvious artifacts (duplicate geometry, noise)
Remediation: If scan quality is insufficient, rescanning takes only 3–5 minutes.
Stage 2 Checkpoint: Design File Verification
Inspection Criteria:
- Aligner thickness appears appropriate (typically 0.5–0.8 mm)
- Trim lines follow planned specifications
- Attachments are positioned correctly for planned movements
- Support structure in LuxFlow preview doesn’t contact critical fitting surfaces
Remediation: If design appears incorrect, modifications in LuxDesign take 5–10 minutes.
Stage 3 Checkpoint: Print Quality Assessment
Post-Print Visual Inspection:
- Aligners are completely opaque (if DCA resin was used, they may appear slightly tinted)
- No visible voids or surface defects
- Thickness appears uniform across all stages
- Support contact points are minimal and cleanly defined
Post-Wash Inspection:
- Aligners are completely clear and transparent
- No residual uncured resin (would appear as cloudy patches or sticky spots)
- Edges are smooth
Post-Cure Inspection:
- Material is rigid and completely transparent
- Alignment flexes minimally when gently bent
- No cloudy areas indicating inadequate curing
Remediation: If curing was inadequate, additional cure cycles take only 10 minutes.
Stage 4 Checkpoint: Final Fit Verification
Pre-Delivery Fit Check:
- Aligner seats on teeth without visible gaps at margins
- Patient can insert and remove without excessive force
- Aligner remains in place during gentle finger pressure
- Occlusion is appropriate (aligner doesn’t excessively interfere with opposing arch)
Remediation: If fit is inadequate, reprinting takes 2–3 hours. Prevention through meticulous quality control at earlier stages is far preferable.
Clinical Outcome Comparison: Direct Printing vs. Thermoformed vs. Outsourced
Research comparing manufacturing methods reveals significant differences in clinical outcomes:
Accuracy Metrics
Overall Fit Accuracy:
- Direct 3D Printing: >96% accuracy with mean discrepancy <0.1 mm
- Thermoformed (lab-printed models): ~75–80% accuracy with mean discrepancy 0.2–0.3 mm
- Thermoformed (outsourced): ~70–75% accuracy with mean discrepancy 0.3–0.5 mm
The superior accuracy of direct printing results from:
- Elimination of model printing errors
- Elimination of thermoforming distortion
- Precision digital control of aligner geometry
- Reduction of human manipulation steps
Material Property Consistency
Thickness Uniformity:
- Direct Printing: ±0.05 mm variation across aligner (programmed variation is intentional)
- Thermoformed: ±0.3–0.5 mm variation (uncontrollable shrinkage and stretching)
A 10% reduction in thickness causes approximately 30% reduction in delivered force. The thickness variation in thermoformed aligners results in unpredictable force delivery—critical problem for clinical reliability.
Force Retention Over Wear Cycle:
- Direct Printing with ActiveMemory™: 95% force retention after 7 days of wear; full recovery after thermal activation
- Thermoformed with PET-G: 60–70% force retention after 7 days; irreversible loss beyond 10 days
- Thermoformed with TPU: 75–85% force retention after 7 days; non-recoverable degradation
The shape memory characteristic of ActiveMemory™ polymers means each aligner effectively “resets” daily—providing consistent force throughout the 7–14 day wear period.
Clinical Efficiency Metrics
Stages Required for Complete Treatment:
- Direct Printing (ActiveMemory™): 8–15 stages for typical mild-to-moderate cases
- Thermoformed: 15–25 stages for comparable cases
- Outsourced Thermoformed: 15–30 stages due to design conservatism
Fewer stages translate to:
- Faster treatment completion (typically 6–12 months vs. 12–24 months)
- Fewer patient visits (critical for compliance)
- Reduced material consumption
- Lower total treatment cost
Patient Satisfaction and Compliance
Wear Comfort:
- Direct Printing: Superior comfort rated 8.5/10 (consistent force, no force peaks)
- Thermoformed: Adequate comfort rated 6.5–7.5/10 (force peaks when new aligners are inserted)
Improved comfort directly correlates with improved compliance—patients who experience discomfort are more likely to reduce wear hours or abandon treatment.
Economics of Same-Day Delivery
Understanding the financial drivers of same-day delivery helps justify the technology investment and plan implementation:
Labor Productivity Analysis
Per-Aligner Labor Time:
- Direct printing: 1.5 minutes of active operator time
- Thermoformed (in-house): 5.5 minutes of active operator time
- Outsourced thermoformed: 0.5 minutes clinic time + external lab labor
The dramatic reduction in operator time per aligner translates to:
Staff Capacity Increase:
With the same staff, a practice can increase aligner production:
- From 15–20 aligners per day (traditional in-house thermoforming)
- To 40–50 aligners per day (direct printing)
This represents 200–300% productivity increase with identical staffing.
Revenue Impact:
- Per-aligner revenue: $250–400 (varies by practice location and positioning)
- Daily production increase: From 15 aligners to 50 aligners = additional 35 aligners × $300 average = $10,500 additional daily revenue
- Monthly: 35 aligners × 20 working days × $300 = $210,000 additional monthly revenue
- Annual (from one printer): $2,520,000 additional annual revenue
Of course, actual productivity increases depend on case volume, but the fundamental mathematical relationship holds: direct printing enables substantially higher throughput with identical staffing.
Cost Structure Comparison
Per-Aligner Costs:
| Cost Component | Direct Printing | Thermoformed (In-House) | Outsourced |
| Resin/Material | $4.50 | $3.00 | $0.00 |
| Labor | $2.00 | $5.50 | $0.00 |
| Equipment depreciation | $2.50 | $1.50 | $0.00 |
| Overhead allocation | $3.50 | $2.50 | $8.00 |
| Outsourced lab fee | $0.00 | $0.00 | $12.00 |
| TOTAL PER-ALIGNER COST | $12.50 | $12.50 | $20.00 |
Counterintuitively, in-house direct printing has similar per-unit material costs to traditional thermoforming, but delivers:
- 3x faster turnaround (2–3 hours vs. 2–4 weeks)
- Superior quality (>96% accuracy vs. 75–80%)
- Elimination of outsourcing dependency
- Flexibility to iterate mid-treatment
Return on Investment Calculation
Equipment Investment:
- iLux Pro Dental printer: $120,000–150,000
- iLuxWash Dental: $15,000–20,000
- iLuxCure Pro: $15,000–20,000
- LuxDesign software (annual): $3,000–5,000
- LuxFlow software (included with printer): Included
- Total First-Year Investment: ~$155,000–200,000
Break-Even Analysis:
Using conservative assumptions:
- Average net revenue per aligner: $100 (after all costs except equipment depreciation)
- Additional daily production: 20 aligners
- Working days per year: 240
Annual Additional Profit: 20 aligners × 240 days × $100 = $480,000
Break-even Period: $180,000 equipment cost ÷ $480,000 annual profit = 4.5 months
Many practices achieve break-even in 3–5 months, meaning the investment fully pays for itself in the first year while continuing to generate significant profit.
Common Workflow Challenges and Solutions
Challenge 1: Scanning Artifacts or Incomplete Scans
Symptom: Treatment planning software shows gaps or unclear tooth anatomy in the digital model.
Solutions:
- Rescanning is the most reliable solution (adds only 3–5 minutes)
- Ensure scanner tip is clean before scanning
- Use systematic scanning protocol to avoid gaps
- Verify scanner calibration regularly
Challenge 2: Design Software Integration Issues
Symptom: Treatment planning files don’t import cleanly into LuxDesign.
Solutions:
- Verify file format compatibility (STL vs. proprietary)
- Check file size (should be 2–5 MB for typical cases)
- Update to latest software version
- Contact LuxCreo support for file conversion assistance
Challenge 3: Print Quality Issues (Warping, Incomplete Prints)
Symptom: Aligners emerge from printer with distorted geometry or incomplete sections.
Solutions:
- Verify build platform is level (run leveling calibration)
- Check resin temperature (23–26°C is optimal)
- Inspect resin tank for contamination (clean if needed)
- Verify aligner orientation in LuxFlow (some orientations print more reliably than others)
- Reduce print speed if prints consistently fail
- Test with fresh resin if current batch appears degraded
Challenge 4: Post-Processing Results in Cloudy or Warped Aligners
Symptom: After washing and curing, aligners appear cloudy or have warped geometry.
Solutions:
- For cloudiness: Increase curing duration (additional 5–10 minute cycles)
- For warping: Verify post-cure heat is not excessively high (should not exceed 60°C)
- For both: Ensure all washing cycles are complete before curing (incomplete washing leaves residual uncured resin that interferes with curing)
Challenge 5: Poor Patient Compliance
Symptom: Patients skip wearing aligners or wear them less than prescribed hours.
Solutions:
- Emphasize treatment timeline in initial consultation (treatment takes 6–12 months if worn 22 hours/day; 18–24 months if worn inconsistently)
- Provide written wear instructions and care guide
- Consider periodic progress photos to maintain patient engagement
- Schedule follow-ups at 1–2 week intervals (closer than traditional 2–3 week intervals) to maintain momentum
Advanced Workflow Optimization Strategies
Batch Processing for Efficiency
Rather than processing individual cases on-demand:
- Collect cases throughout a day or week
- Process in batches through LuxDesign and LuxFlow (reduces per-case overhead)
- Print in batches (nests multiple cases on single build platform)
- Post-process in batches (wash and cure multiple cases simultaneously)
This batching approach:
- Reduces software processing overhead (fixed setup time amortized across multiple cases)
- Maximizes printer utilization (fills build platform completely)
- Enables efficient equipment scheduling (avoiding fragmented usage)
- Can increase throughput 30–50% compared to on-demand processing
Scheduling Considerations
Case-Specific Scheduling:
- Straightforward cases (mild crowding, spacing, alignment): Schedule for 2–3 hour appointment with patient present
- Complex cases: Consider pre-printing before patient appointment, delivery at appointment (reduces chair time)
- Mid-course refinements: May not require full digital workflow reprocessing—often use pre-designed stage adjustments
Staff Scheduling:
- Digital planning: 1 clinician (orthodontist/dentist)
- Printing: 0 staff (automated)
- Post-processing: 1 technician
- Patient delivery: 1 clinician + 1 assistant
Strategically schedule these roles to maximize efficiency.
Conclusion: Mastering the Complete Digital Workflow
The transition from week-long outsourced aligner production to same-day chairside delivery represents a fundamental transformation in how practitioners deliver orthodontic care. Mastering this workflow requires understanding not just the equipment, but the intricate software integrations, file formats, quality checkpoints, and process optimizations that enable reliable, efficient production.
The complete workflow—from initial intraoral scan through final patient delivery—compresses into 2.5–3.5 hours of elapsed time, with only 30–45 minutes of active operator engagement required. This dramatic efficiency, combined with superior accuracy (>96% vs. 75% for thermoformed), consistent force delivery (ActiveMemory™ shape memory), and profound flexibility for mid-treatment modifications, creates a compelling value proposition.
For practices implementing this technology, the key success factors are:
- Comprehensive Staff Training: Ensure all team members understand the complete workflow, not just their specific role.
- Rigorous Quality Control: Implement quality checkpoints at each stage; catching problems early prevents costly reprinting.
- Process Discipline: Follow validated protocols consistently; workflow deviations often precede quality failures.
- Continuous Optimization: Document your results, measure efficiency metrics, and systematically optimize bottlenecks.
- Patient Communication: Set clear expectations about treatment timelines, wear compliance, and care protocols.
The future of dental 3D printing lies not in simply purchasing equipment, but in systematically mastering the integrated workflow that transforms digital designs into exceptional clinical outcomes. By understanding each stage of the workflow and the critical interactions between stages, you position your practice to deliver superior patient care while building a highly profitable, sustainable orthodontic business model.
References and Further Resources
- LuxCreo In-House 3D Printed Aligner Workflow: https://luxcreo.com/the-in-house-3d-printed-aligner-workflow-from-scan-to-same-day-smile/
- LuxCreo How to 3D Print Aligners: https://luxcreo.com/how-to-3d-print-aligners/
- LuxCreo 4D Aligner Guide: https://luxcreo.com/the-ultimate-guide-to-4d-aligner-and-shape-memory-technology/
- LuxCreo Direct Print Aligner Buyer’s Guide: https://luxcreo.com/choosing-the-best-in-office-aligner-treatment-a-buyers-guide/
- LuxCreo 4D Aligner™ Product Page: https://luxcreo.com/4d-aligner/
Subscribe to Our Newsletter
Be the first to get our latest updates and free trials!
Popular Resources


Follow Us
![]()
![]()
![]()
![]()
Featured Products

4D Aligner™
First Smart ActiveMemory™
Aligner
")
iLux Pro Dental Solution
Ultimate 1-Click Dental
Application Solution
")
LuxCloud Dental
Your One-stop Digital Dentistry
Platform